
Are you considering to disable Telnet port 23? Then this article will help you out.
It’s obvious that more and more companies start investing on the security aspect of their environment. We see that the legendary legacy protocols, such as http, ftp or telnet ports, become useless day by day. As the technology evolves, new more secure protocols become as a new standard.
Prior to FOS 5.3.0 you could turn off the Telnet sevice by executing the configuration command on the switch. However, the latest FOS versions do not support altering communication services by the configuration command. Instead, we will need to modify the ipfilter database and deny traffic on port 23.
Before we start, let me give you a short guide on the steps we will take. As you probably know, the ipfilter is a table where the incoming and outgoing traffic rules are defined. Every switch by default has 2 ipfilters: IPV4 and IPV6. In short, we will:
- Clone the existing Ipfilter
- Remove the rule to allow traffic on port 23
- Define new rule to deny traffic on Telnet port 23
- Save and activate the new iptables configuration
Table of Contents
View existing iptable configuration
To show the current ip filter rules, enter: ipfilter –show
STORFOS:FID128:storcom> ipfilter --show

Name: default_ipv4, Type: ipv4, State: active
Rule    Source IP                               Protocol   Dest Port         Action
1     any                                            tcp       22            permit
2     any                                            tcp       23            permit
3     any                                            tcp       80            permit
4     any                                            tcp      443            permit
5     any                                            udp      161            permit
6     any                                            udp      123            permit
7     any                                            tcp      600 - 1023     permit
8     any                                            udp      600 - 1023     permit

Name: default_ipv6, Type: ipv6, State: active
Rule    Source IP                               Protocol   Dest Port         Action
1     any                                            tcp       22            permit
2     any                                            tcp       23            permit
3     any                                            tcp       80            permit
4     any                                            tcp      443            permit
5     any                                            udp      161            permit
6     any                                            udp      123            permit
7     any                                            tcp      600 - 1023     permit
8     any                                            udp      600 - 1023     permit
Clone existing configuration
Go ahead and clone both iptable configurations. In the example above, they are named: default_ipv4 and default_ipv6. I will give the clones a new name: BlockTelnet_ipv4 and BlockTelnet_ipv6.
ipfilter --clone BlockTelnet_ipv4 -from default_ipv4
ipfilter --clone BlockTelnet_ipv6 -from default_ipv6
Save the clones you just created
ipfilter --save BlockTelnet_ipv4
ipfilter --save BlockTelnet_ipv6
Modify the cloned ipfilters
Next, we will remove rule 2 which permits traffic on port 23, then define a new rule that denies traffic on port 23.
To remove Rule 2 on the cloned ip tables, enter:
ipfilter --delrule BlockTelnet_ipv4 -rule 2
ipfilter --delrule BlockTelnet_ipv6 -rule 2
Use the following command to deny traffic on TCP port 23
ipfilter --addrule BlockTelnet_ipv4 -rule 2 -sip any -dp 23 -proto tcp -act deny
ipfilter --addrule BlockTelnet_ipv6 -rule 2 -sip any -dp 23 -proto tcp -act deny
Save configuration and activate ipfilters
To save the modified ipfilter clones, enter:
ipfilter --save BlockTelnet_ipv4
ipfilter --save BlockTelnet_ipv6
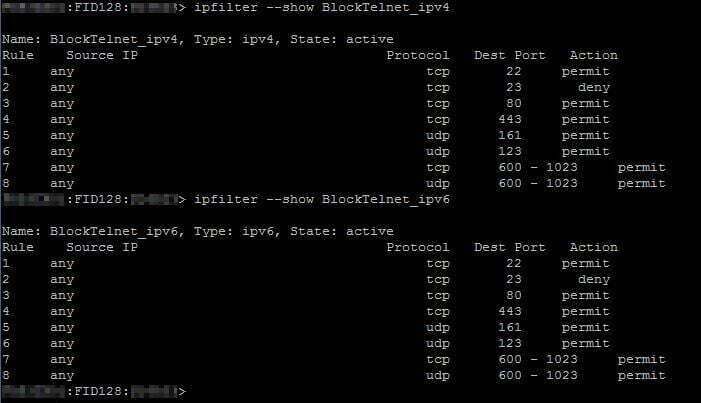
Before you activate, you can double-check the new configuration by entering the command:
ipfilter --show BlockTelnet_ipv4
ipfilter --show BlockTelnet_ipv6
Finally, you can activate the new ipfilters
ipfilter --activate BlockTelnet_ipv4
ipfilter --activate BlockTelnet_ipv6
Removing an ipfilter
Alternatively, if you think need need to clean up the ipfilter policies, it is very easy to do it. Use the following command:
STORFOS:FID128:storcom> ipfilter --delete BlockTelnet_ipv6
This will delete the IP filter policy.
ARE YOU SURE (yes, y, no, n): [no] y
Sources
Read here related articles for Brocade switches:
- Enable HTTPS protocol on Brocade switches
- Brocade ISL Trunk configuration
- Brocade Fabric OS Administration Guide, 8.2.0
Any suggestion or question? Leave a reply below, or feel free to contact us. Make sure to subscribe to our mailing list to get the latest.


6 Responses
Just the tiniest of typos on this section:
Before you activate, you can double-check the new configuration by entering the command:
ipfilter –show BlockTelnet_ipv4
ipfilter –show BlockTelnet_ipv4 <– here, ipv6.
Otherwise, thank you very much for such a well written and easy to follow guide; we had our brocades light up during an audit for telnet being open, was surprised they removed the ability to edit the service.
Cheers again!
Dave.
Hello David,
Thanks for the tip, I have corrected the typo.
Happy to have been of assistance.
Cheers,
Dardan
Thanks a lot for the post, it works perfectly.!!!
Thank you!
Thank you very much for this. It seems that whenever I encounter a Brocade switch in a network, no one knows how to manage it. I hope you post more!
How to Modify after activate new ipfilters.