This article covers the implementation of CommVault archiving for the O365 Exchange Online environment. As is generally known, in these times, more and more companies are moving their applications to Cloud, including Sharepoint and Exchange.
In a traditional Exchange environment (on-prem), CommVault software is used to perform backups of Exchange databases (DAG’s). A database can contain up to a hundred or thousand mailboxes. The downside of such an approach is that when performing a restore of a single mailbox, the whole database needs to be restored.
Unlike the case with Exchange backups on-prem, archiving of Exchange Online mailboxes is done in a more granual way. In short, each mailbox / e-mail content is archived using CommVault access nodes. Hence, restores are also more granular, meaning you can restore a single mail or mailbox.
Table of Contents
Exchange Online Requirements
At this time of writing, I’m using CommVault version 11 Service Pack 24. CommVault documentation page provides an extended explanation of pre-requisites and best-practices, however in this article highlights the most important ones. I’ll be covering every step using CommCell Console, however there is also Command Center available with most of the tasks automated.
Basically, what you’ll need to set up the environment is the following:
- An CommServe environment (assuming you already haver one, as you landed on this page)
- Media Agent(s)
- Access Node(s) or proxy servers that establish the connection with the O365/Exchange Online API’s
- An Index Server – preferably on separate VM
- A Storage Policy for your Exchange Online archives
In short, the flow between your backup target location and O365 API’s goes as following:
O365 (Cloud) API’s > CV Access Nodes > (optionally Media Agents) > Storage Library
Service Accounts and Application ID’s
In order to connect, discover and perform archive operations of Exchange Online we need to have some administrative & privileged accounts.
- Local service account: This is a local admin account used on the access nodes
- Exchange Online Service account: This is an Exchange Online (O365), global admin account and is used to discover mailboxes from the tenant
- Application ID‘s are used to perform archive operations in Modern Authentication mode. When using Command Center, you can register application ID’s automatically by using the custom toolkit or you can register them manually by following Registering Exchange Online with Azure.
Ports
Assuming your O365 environment is hosted in public (All Regions) hosting at Microsoft. You’ll need to have the following ports and URL’s allowed on your proxy/firewall (if any in-between) devices:
Protocol: https
Ports: 80, 443
URLs:
- https://www.office.com/
- https://outlook.office365.com/Powershell-LiveID
- https://outlook.office365.com/EWS/Exchange.asmx
- https://login.microsoftonline.com/
- https://graph.microsoft.com/
CommVault Online Access Nodes
An Access or Proxy node is the edge server used to establish the connection with O365 API’s and perform the archiving jobs. Depending on your needs, you can always start off with a single access node, then scale out to more nodes. Find below recommendations of an Access Node in a setup using Content Indexing.
| Environment | Medium | Large |
|---|---|---|
| Mailboxes | 5,000 | 10,000 |
| Messages per day | 500,000 | 1 million |
| Guidelines | ||
| Access nodes | Normal availability: 1High availability: 2 or more | Normal availability: 1High availability: 2 or more |
| CPU or vCPU for the access nodes | 8 cores | 16 cores |
| RAM for the access nodes | 16 GB | 32 GB |
| Streams per access node | 10 | 20 |
| Azure apps | 5 | 10 |
CommVault Index Server
An index server is used to store metadata, perform content indexing and search mailboxes for message when requesting a restore. You can install the indexing feature on an access node, but it is highly recommended that you create the index cache in a separate server.
| Environment | Small | Medium | Large |
|---|---|---|---|
| Application | 5 TB | 15 TB | 25 TB |
| Mailboxes | 400 | 2,000 | 5,000 |
| Objects per node (estimated) | 50 million | 150 million | 250 million |
| Guidelines | |||
| CPU or vCPU | 8 cores | 16 cores | 16 cores |
| RAM | 16 GB | 32 GB | 64 GB |
| Index disk | 2 TB | 6 TB | 10 TB |
| Index disk IOPS | Minimum: 800 | Minimum: 1,600 | Minimum: 2,400 |
Archiving Policy
- In CommCell console go to Policies > Configuration Policies > Exchange Policies
- Right click on it and select New Archiving Policy
- Fill in the name and the desired information and finish by clicking OK.
CommVault Exchange Online software installation
Make sure to download the latest CommVault software before starting with the installation and configuration of Exchange Online nodes.
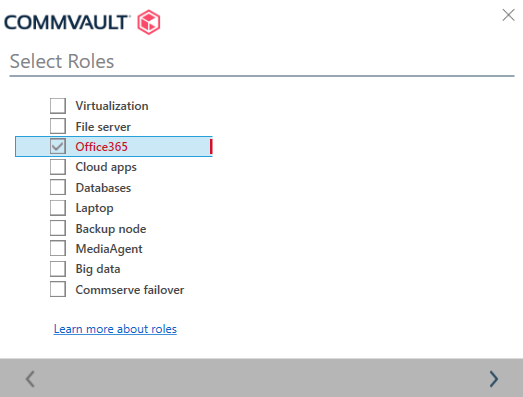
Access Node
The setup on the access node is an easy and straight forward installation. The only thing that you need to pay attention to is the selection of CommVault roles. When prompted, select Office365 as seen in the figure below.
Index Server
The installation of the Index Server is pretty much the same as the access node, however, there are some things to pay attention to when installing it. Make sure to create an extra disk on the server of 2 TB.
- When prompted if you want to Create a new CommCell, Join and existing CommCell or Advanced selection select the last option Advanced selection.
- Under Window Packages, tick off the following features: Index Store, Index Gateway and Content Extractor.
- The Installation path can be left as default.
- Index Cache path: select the extra disk you created previously, in my case the path becomes: E:\Program Files\CommVault\ContentStore\IndexCache.
Creating and configuring Exchange Online client
Before we create the Exchange Online Client, we need to have the Indexing Server ready.
Creating Index Server
In CommCell Console, expand Client Computer Groups, right click on Index Server group and select New Index Server. Under General tab, give the index a name, e.g.: O365-ExchangeOnline
– Check Enable Cloud and enter Index Directory, e.g.: D:\Index\
– Uncheck Enable Cloud
Under Roles tab select Exchange Index and click on Include >
Finally, under Nodes tab, click on Add and and add the server name of the Index Server.
Creating Exchange Online client
- In CommCell Console, right click on Client Computers and select New Client
- Under Application, click on Exchange Mailbox and select User Mailbox.
The wizard consists of different settings, which can be defined according to your needs.
General tab
- Fill in the client name, e.g.: STORCOM_EXO
- Storage Policy: An earlier defined storage policy. See CommVault documentation on how to create one.
- Index Server: The name of the Index Server you created previously
- Job Results Directory: This is a shared network path. I usually create a shared folder on the first access node, for example: \\STORCOMSRV01\JobResults\
Access Nodes
- Click on Add to add one or more access nodes
Environment Type
- I assume you have a O365 environment which is independent of your on-prem environment, in this case select Exchange Online (Access through On-premises Active Directory), in other cases use Exchange Hybrid (or Exchnage On-Premises)
- Select Use Modern Authentication
When using Modern Authentication, Application ID that you will create are used to perform archive operations.
Azure App Details
- Leave Cloud Region as Default (Global Service)
- Click on Add and start adding Application ID’s that you created previously.
Service Account Settings
At this step you need at least two service accounts. One will be a local admin account on your access nodes, and the second one is a Exchange global admin account in Azure.
- Click on Add and start adding your service accounts
Other tabs (Other/Advanced, AD Server, Security, Activity Control) are optional and to be used in specific environments.
Discovering Exchange Online mailboxes and running the first Archiving job
Once you have completed the above steps, we are one step closer to starting the first archiving job. In order to launch the backup (archiving job), we first need to tell CommVault what mailboxes to archive.
Discovering mailboxes
- Go to the Exchange client (named: O365-ExchangeOnline) we created previously
- Expand Exchange Mailbox, and User Mailbox and select the subclient, named by default usermailbox
- On the bottom click on Mailboxes
- Right click on the page and select New Association > User
- Click Configure and then Discover
At this point the discovery of mailboxes will start running in the background. In my case it took 10 to 15 minutes for the discovery process to finish. - Repeat same steps after 10 to 15 minutes until the mailboxes are discovered.
- Once done, select them all, uncheck Perform discover operation in cached mode and click OK
- Finally under Policies tab, select the archiving policy we created previously and we are done.
First archiving job
After a successful completion of the above steps, we are ready to start the first archiving job.
- In CommCell Console click on the Exchange Online client, under User Mailbox select the subclient
- Right click on the subclient usermailbox and click on Archive
- The first archiving operation will be always a full
- Finally click on OK to start the job.
Any suggestion or question? Leave a reply below, or feel free to contact us. Subscribe to our mailing list for the latest updates.